
A 70 cm wide corridor between two walls, a master bedroom of 9 m², a recess under a sloping ceiling: we almost never start with an ideal space to install a dressing room. The real challenge is not to dream big, but to fit precise centimeters into existing constraints. Choosing the dimensions of a functional dressing room is first about accepting that each wall and corner imposes its own rules.
Dressing Room Depth: The Parameter That Conditions Everything Else
We often start with length or surface area. This is a mistake. The depth of a storage module determines the type of wardrobe possible, the remaining circulation space, and ultimately, the comfort of daily use.
You may also like : The best tips for drying your basil to perfection
The standard for hanging clothes on hangers parallel to the wall is around 58 to 60 cm. Below this, the shoulders of coats or jackets bump against the back wall. If you have less than 55 cm, you need to switch to hangers perpendicular to the wall, mounted on cantilevered wardrobes.
Several manufacturers now offer shallow dressing rooms (40 to 45 cm) designed for small urban spaces, featuring this type of side wardrobe that maintains good accessibility.
See also : How to Choose the Right Thermal Insulation and Comply with RE 2026 for Your Walls
To properly frame the dimensions of a functional dressing room, measure the available depth from the load-bearing wall to the edge of the circulation area, then subtract the clearance margin. This minimum margin is around 75 cm in front of the storage to open a drawer or take out a hanger without backing into an obstacle.
The choice of door also directly affects the usable depth. Sliding doors do not encroach on the circulation space, whereas hinged doors require additional clearance in front of the unit. In a narrow bedroom, this difference of a few centimeters changes everything.

Usable Heights and Liftable Wardrobe: Exploiting Vertical Volume
Most guides simply provide a height for the rod. In practice, the issue is more nuanced: the ceiling height dictates the number of usable levels.
With a standard ceiling height of around 2.50 m, you can fit two levels of wardrobe (one high for coats, one low for shirts or short skirts) and a shelf or passive storage area at the top. When the ceiling exceeds 2.40 m, especially in older apartments or converted attics, the high area becomes difficult to access with outstretched arms.
This is where liftable wardrobe systems (also known as tilting wardrobes or “lifts”) come into play. A bar fixed at a height lowers towards you thanks to an articulated arm mechanism. This way, you can utilize the entire vertical column without a step ladder. In recent years, these devices have become more common among carpenters and in custom storage brands.
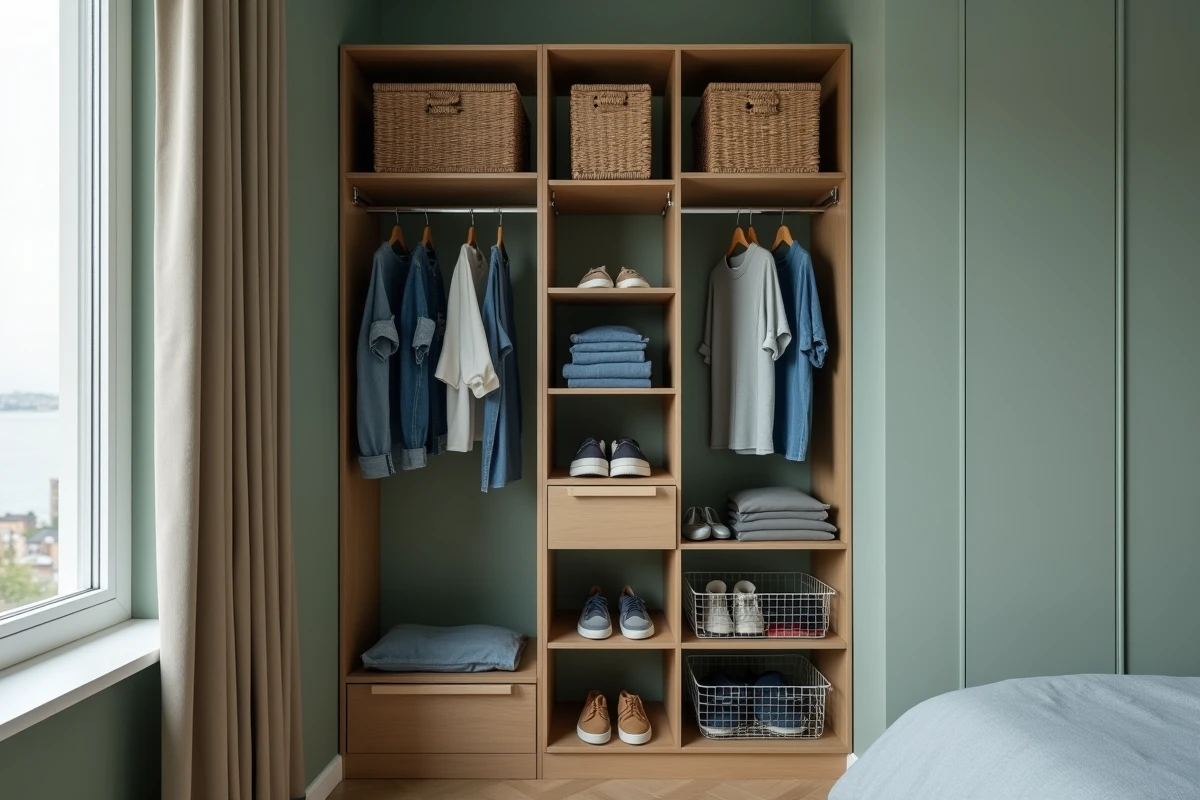
Concrete Vertical Distribution
- Lower zone (from the floor to about 40 cm): drawers, sliding baskets, shoe storage. Not practical for hanging clothes, this area is suitable for heavy or infrequently accessed items.
- Active zone (from 40 cm to about 180 cm): main wardrobe, eye-level shelves, trouser racks. This is the section used every morning, and it should concentrate the majority of the current storage volume.
- Upper zone (above 180 cm): seasonal storage, suitcases, duvets. If the height allows, a liftable wardrobe transforms this space into a semi-active area.
Technical Zones and Wiring: What We Forget During Sizing
A dressing room is no longer just a simple alignment of rods and shelves. The growing demand for integrated technical zones (motion-detecting LED lighting, charging outlets, even USB ports) changes how modules are sized from the start.
Specifically, if you plan for interior lighting or outlets, you need to anticipate the passage of electrical conduits. This requires a gap of a few centimeters between the back of the dressing room and the wall, or a sufficient depth of uprights to accommodate a cable. Not considering this during design forces you to drill, shift shelves, or run visible cables, which is rarely satisfactory.
Integrated LED lighting under each shelf or at the top of each column truly changes the use of a dressing room, especially if it is installed in a windowless space (nook, transformed closet, under stairs). Planning for electrical reservations at the time of measurements avoids unpleasant surprises once the unit is installed.
Shared Dressing Room for Two: Symmetrical Modules and Adjustments
When the dressing room is used by two people, the question of dimensions doubles. Each has wardrobe, drawer, and shelf needs that do not necessarily coincide.
Feedback from custom storage designers shows a clear trend towards symmetrical but adjustable modules. The principle: two identical columns in structure, but with adjustable shelves (at 32 mm increments on standard rails) and telescopic bars that allow for space rebalancing over time. If one of the occupants accumulates more hanging clothes, you can move a shelf or add a rod level without dismantling everything.
For this system to work, the total width of the dressing room must allow for at least two columns of at least 60 cm each. Below this, you end up with a space where the separation of uses becomes artificial. Feedback varies on this point, but in practice, a linear space of at least 1.50 m seems to be the threshold below which a shared dressing room generates more frustration than comfort.
Design Tip for Sharing
Placing a central drawer unit between the two wardrobe areas creates a clear physical separation. This unit can hold accessories, belts, or jewelry, and serves as a visual marker to delineate spaces without partitioning.
The sizing of a dressing room hinges on details that are not visible on a marketing plan: the thickness of a post, the clearance needed to open a drawer, the passage of a cable behind a shelf. Taking the time to measure each constraint before purchasing a single module remains the best investment for a storage solution that works daily, not just on paper.